With school holidays upon us, Tony turned up with a small old screen he had been given and asked if I would like to join him in involving the grandchildren in some simple printing with it. (Tony taught screen printing in Coffs Harbour for many years at the Jetty High School. He later instigated the printing of shift lengths by Aboriginal ladies in the area, as part of a series of craft workshops.)
When Amelia and Julia came for our screen printing session, we each made a different design which we could print onto plain white cotton pillow slips which I had first washed, dried and ironed so as to accept the dye well.
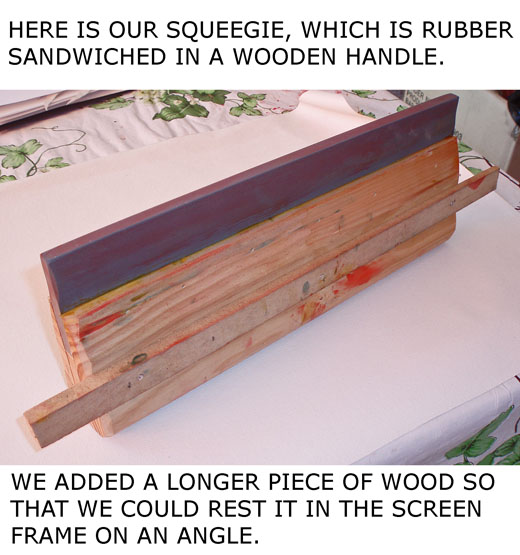
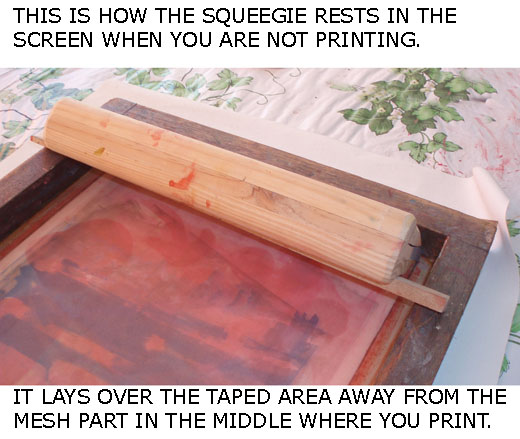
Here is the equipment we used – we only had one screen so had to clean it in between colours… so 1 screen, 1 squeegie, primary colours of red, yellow and blue fabric screen printing dyes, (+ a transparent “white” for diluting a colour to a pastel tint), newsprint, rags & sponges + a bucket of water for cleanup. The second in the picture is just to rest the screen on once it is inked up so that it doesn’t touch the table in between prints.

Now let’s have a closer look at …


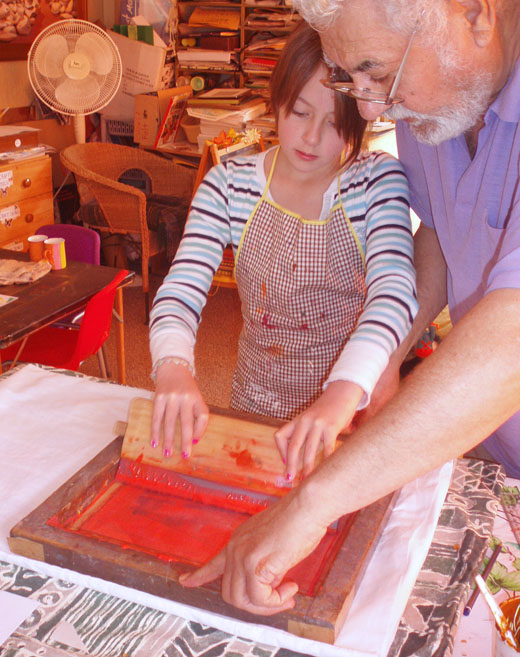
You need to hold the squeegie at a 45 degree angle in the direction you are going when you print. Usually, you first come towards you in one sweep, then making sure there is enough ink right along the rubber edge towards the mesh, sweep it back way from you – as Amelia is doing in the picture below. It helps to have someone hold the screen steady as you need to press firmly and evenly as you glide it from end to end.

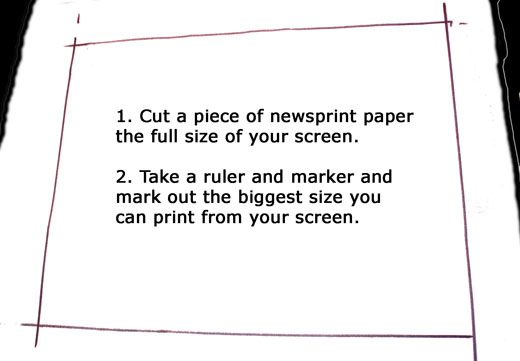
There are many ways to make stencils. This is an easy one, using newsprint (which we used to call “Butcher’s paper”). Here is the first step…

Now the second step…(You may need to hold the paper up to the light to see where the lines are).
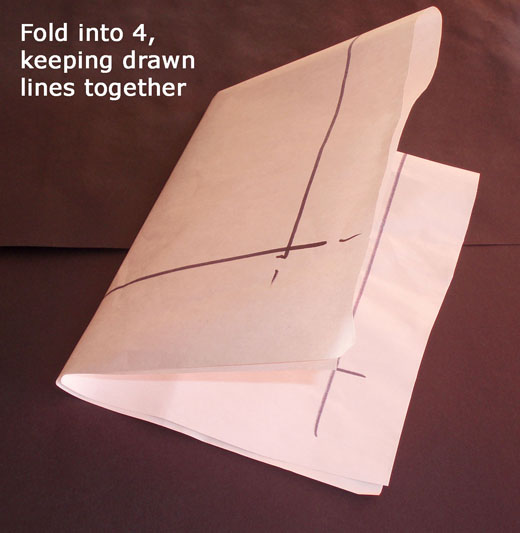
You can fold again at any angle you wish…and as many times as you wish before cutting.

Then try out some shapes, cut on the folded parts…remember you are cutting only part of a shape and the rest will be seen when you open it up…

Here is this pattern opened up .. remember we only cut out half a love heart, half a butterfly and a tiny part of the centre star.

JULIA’S DESIGN
Next we prepared a padded surface to work on using an old folded blanket with smooth cloth over it. We put some newspaper on this and laid down the stencil. Then we placed the screen over the stencil, carefully making sure the design fitted evenly within the mesh area and the edges of the paper overlapped the taped sides so that ink could not leak through on the edges.
This next step is to make the stencil stick to the screen before we print onto our pillow slips – so Julia chose the colour dye she wanted and loaded it up with a spatula along the length of the squeegie at the end of the screen.

Julia now lifted the squeegie and put it behind the dye – then pulled it towards her pressing down firmly and evenly to spread the dye over the mesh. It doesn’t matter which way you start, so long as you sweep the squeegie forward and back with plenty of ink.

The dye went through the mesh and stuck the stencil to it everywhere there were no stencil holes. This is what the screen looked like underneath now.

Next it was time for Julia to print onto her pillow case. Tony helped her with the first pull going one way…

Then Julia went back the other way by herself…
Then she lifted up the screen and there was her print! Perfect!

Julia added a second print like this to her pillow slip, then later a third one in blue between them, so it looked very nice when it was finished. Both she and Amelia swapped stencils with their middle blue print, for variety.
________________________________________________________
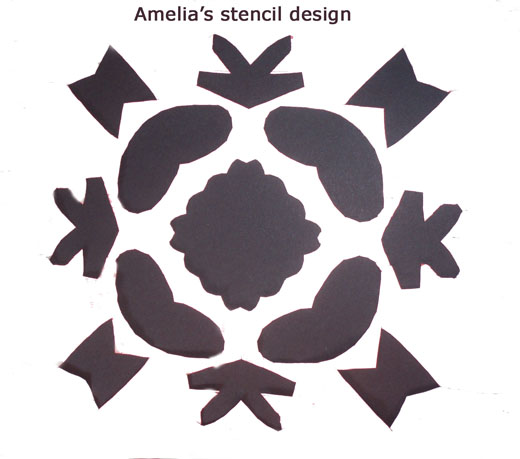
AMELIA’S DESIGN
Next, it was Amelia’s turn…here is her design, cut out the same way as Julia’s but with different shapes.
First sticking the stencil to the screen…

Then printing on her pillow slip…

and here is her lovely print…

Here is Amelia’s finished pillow slip, after adding two more prints…the colour was much lighter and softer than my photo recorded.
____________________________________________________________
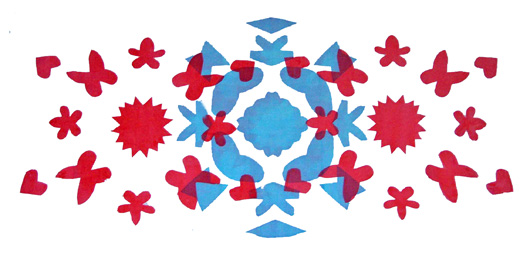
JULIE’S DESIGN
Next it was my turn. I cut my stencil out with a tiny craft knife, being very careful not to cut my fingers. Sorry – I forgot to photograph it when I first cut it, but here it is after printing – so you can see it just the same.

Here is the stencil stuck to the mesh of the screen…

Here is my first print on my pillow slip…
Then I repeated it alongside…

Next, after cleaning the screen, I mixed a light blue using transparent ink to dilute the colour. Where the blue overlapped the red it formed a third purply colour which is what I had hoped would happen. I diluted the blue because I didn’t want the places where it overlapped the red to be too dark.

Then I repeated it, turning the stencil around the other way for variation.
The prints need to dry before you print the next colour each time, but it doesn’t take very long usually, especially if you peg them up with air around the fabric and by the time I cleaned the screen and mixed my next ink colour, I could go on printing.

Then more cleaning of the screen while the blue print dried and this time I used yellow – still with the same stencil, hoping that where the yellow overlapped the blue it would make green. It did! Also where the yellow overlapped the red, it made it more orange.

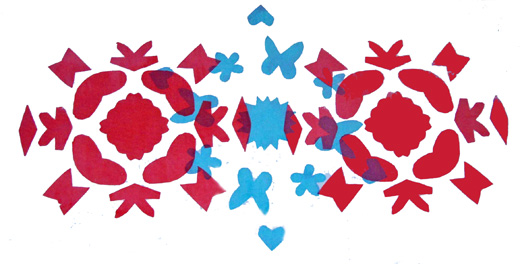
I used the yellow twice more and this is my finished design – a very colourful pillow case to have happy dreams on! Printing a third time in the middle united the 2 sides.
Now a confession! I accidentally got a few tiny bits of dye on the material outside of the finished design – so to cover them up, I took a brush and painted some small shapes over them (the little butterfly and petal shapes). They give more variety by loosening up the pattern, even though the distribution of the dye is not as even in those parts as it is through the screen – but this is not “proper” print technique – its just my way of getting out of a problem!

You can also draw with fabric laundry markers to add to your design if you like. I just used one to sign my name in the corner.
__________________________________________________________
TONY’S EXPERIMENTAL DESIGN
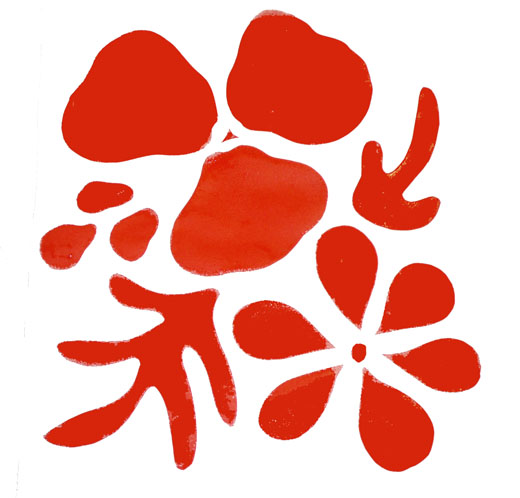
Tony’s turn now and he decided to use confetti as an experiment! He sprinkled it down onto heavy paper, then placed the screen over, sweeping the squeegie across with a mixture of orange and green dye to pick up the confetti onto the screen. Then he printed this…

Tony then took some of the confetti off the screen, added more dye and printed a second one. I think they are beautiful patterns. If he had used dark blue it would look like a night sky!

IMPORTANT! When the dye is quite dry on your fabric design, it needs to be made colour fast by ironing both sides with a fairly hot iron – otherwise it may run when washed.
There are many things you can use for designs. Sometimes we draw around shadows or used pressed leaves like these.


So if you ever have a chance to do some screen printing, have a go – it is fun, a bit messy and a fair bit of work … but worth it!
You can print many, many times from one stencil and repeat prints for curtains, bedspreads & place mats etc. look beautiful!
But maybe you would just like to print ONE Tee-shirt and that’s OK too!
We all enjoyed our day of printing very much. It brought back memories for me of hand making my own edition of 500 children’s books in 1985 using Riso Print Gocco methods, which are quite different and much more sophisticated. As well as the books, I printed lots of Tee shirts (see examples below) using a squeegie and fabric dye just as we did above- but the finely detailed screens were developed using carbon melted by strong light. Tony said he has done a similar thing, using sunlight!


Did you enjoy our introduction to fabric printing? Don’t forget, if you have any questions, please ask in the Comments box below and we will try to help.
Cheers!
Julie

Thanks for Sharing useful Information. I appreciate your Content.
By: Tranfer It on July 12, 2018
at 12:17 pm
My pleasure.
By: Julie Duell on July 12, 2018
at 9:09 pm
can you plzz tell me the process how can i transfer a photo on the canvas of screen print plzzzz need to know
By: Bristy Bilas on June 13, 2014
at 6:16 pm
Sorry I can’t help with that. There are printing and camera shops who can do it for you. Just take your photo to them and they can enlarge it, then print it onto a canvas of the same ratio. They usually supply the canvas and will mount it onto a frame after printing if that is what you wish.
By: Julie Duell on June 13, 2014
at 9:57 pm
Hello.
I found the article on screen printing interesting, I have a project to print on cotton, approx 75×30 Cm.
As I have never done this before, I first need to make a screen frame, is fly
screen mesh ok, or do I need to buy “special” mesh.
Any advice will be most helpful.
Kind regards, John.
By: john wakefield on October 18, 2013
at 7:15 pm
There are excellent sites that show how to make screens. Personally I have only bought ready made ones.
Fly screen mesh I think would be far too open. The proper bought mesh looks more like nylon curtaining.
Try http://www.instructables.com/id/How-to-make-and-print-with-reusable-silk-screens/
By: Julie Duell on October 18, 2013
at 9:00 pm
how can we create the screen
By: alan janssen on July 30, 2013
at 10:47 am
There are excellent sites that show how to make screens. Personally I have only bought ready made ones.
You could try http://www.instructables.com/id/How-to-make-and-print-with-reusable-silk-screens/
By: Julie Duell on July 30, 2013
at 1:05 pm
Hi,
I want to know how to create the screen printing box, can you please help me showing step by step to create the box ?
By: Papu on March 2, 2009
at 11:45 am
Well, it is great to ‘see’ Tony again! He taught me art at Tafe in the early 90’s here in Coffs Harbour. When you see him next say ‘hi’ for me. This is a great run down on simple screen printing that I will be bookmarking for later (when I have spare time!)
By: Jan on November 19, 2008
at 10:03 pm
Hello Susan,
Yes, you have the layers all in the right order, except that you need to
attach the stencil to the mesh on the flat side of the screen
before printing on the fabric.
To do this you place the stencil down on some butchers paper or newspaper,
then carefully position the screen over it
making sure the cut out areas are within the printable area of the mesh & the outside edges overlap the sides of the screen so that no ink can get through where you don’t want it to.
Ink up the screen on one end and press the squeegee firmly across, spreading
the ink over
the length of the screen just as you would for printing on the fabric later.
Then squeegie back the other way again.
The ink goes through the mesh and adheres the stencil to the screen. Peel
off the newspaper (I use butchers paper
so that I can keep that first print as a sample for future reference. It is
easier to see on plain paper rather than printed).
Now you are ready to print on the fabric.
Any more questions, don’t hesitate to ask.
By: Julie Duell on November 19, 2008
at 9:49 pm
I meant bottom to top, sorry! Oh dear.
By: Susan on November 19, 2008
at 7:52 pm
Hello! Can you clarify please? I haven’t done this in decades. Have I got the layers correct (top to bottom order):
— blanket for ease
— the fabric to be printed on
— the cut out stencil loose, not attached
— the actual frame with the mesh
— the ink
— the squeegee, etc etc
Is that right?
By: Susan on November 19, 2008
at 7:51 pm
Thanks Donna – please let us know how you get on. I am keen to experiment with torn newspaper edges on the stencils for soft edge printing. Also putting down the stencil paper on a garden path or wall and drawing around the some of the shadows caste by foliage on the paper. Perhaps others would like to try this. Julie
By: Julie Duell on August 7, 2008
at 6:41 am
You explain so well! I’m an art teacher but haven’t done silk screen since I was in college eons ago. I have a screen kit, waiting to be tried, and now I think your way of adhering the stencil is so much easier than doing a photosensitive-exposure! Maybe I’ll have time to do some printing before fall semester starts next month…thanks!
By: donna on August 7, 2008
at 5:59 am